IN THIS ARTICLE
Submitting Media to O3DE Documentation
There are two available methods to add images to topics in Open 3D Engine (O3DE) documentation. You can use markdown syntax, or the image-width shortcode. If you are adding multiple images, very large images, or .svg diagrams, consider using the image-width shortcode to limit the width of images as the image scales to the width of the browser window.
Adding images with markdown syntax
To add an image with markdown syntax, use syntax similar to a link, preceded by an exclamation mark. The text in the brackets is displayed when the image does not load. Inside the parentheses is the link to the image asset, and an optional image title in double quotes.
Image example:

Image output:
Adding images with the image-width shortcode
The image-width shortcode adds an image with alternate text and restricts the image’s width. The image-width shortcode can ensure image sizes are consistent within a topic, and that large images don’t scale overly large in wide browser windows. Use this method when adding .svg diagrams, very large images, and in topics with multiple images where consistent image widths are desirable.
image-width takes three double-quoted named parameters:
src="/images/<image.png>"- Image file path.width="<image width>"- Scale the image by specifying a width in pixels.alt="<image description>"- A string describing the image.
image-width example:
{{< image-width src="/images/welcome-guide/guide_img.png" width="700" alt="The O3DE Welcome Guide splash image." >}}
image-width example output:

Alternate text
Alternate text for images is very important. It provides a description of the image if the image is not loaded. The alternate text is also used for accessibility and in search engine optimization (SEO). Ensure that the alternate text provided for images clearly describes the contents of the image.
Image file location
Images are placed subdirectories of the /static/ directory of the O3DE documentation repository.
Guide-specific images, such as interface screenshots and diagrams, are located in subdirectories of /static/images/. The directory structure of /static/images/ is a mirror of the directory structure of /content/docs/. Shared images like logos are placed in subdirectories of /static/img/. When submitting images as part of a PR, ensure the images are placed in the appropriate subdirectories.
General image guidelines
In order to standardize presentation, and to keep the O3DE documentation repository below 1 GB, please adhere to the following guidelines when you create images for documentation:
Text in images should follow our style guidelines without formatting requirements.
Do not include personal identification information (PII) in your screenshots. PII includes, but is not limited to, names, geographic information, project names, IP addresses, DNS names, and directory paths. We recommend you crop out areas of images that might contain PII and that you create projects specifically for documentation contributions that do not expose PII. Using common image filters to blur or disguise PII is not recommended as they can sometimes be reversed. To remove PII from an image:
In any image editor, draw a rectangle selection box around the PII.
Use the cut tool or CTRL+X to cut the information from the image completely.
Fill the empty selection area with a solid color such as black or white.
Save the edited image and include it with your PR.
Important:Be sure to thoroughly examine all images for PII before adding them to a pull request!
Screenshots
Screenshots are images of various O3DE user interfaces, or the interfaces of other applications such as content creation tools.
- Use the PNG format (
.png) for all screenshots. - Take interface screenshots at HD resolution (1920x1080).
- Ensure the image resolution has an even number of pixels in both width and height.
- Don’t use aggressive compression for interface screenshots. Heavily compressed files may make text and UI elements less legible.
- Screenshots should not exceed 512 KB in size.
- Use the default interface scale for screenshots.
- Use the default interface color theme for screenshots.
- Use the default interface layout whenever possible.
- Don’t scale screenshots that have interface elements.
- Crop interface images to contain only the necessary elements whenever possible.
- Screenshots for tutorial and user guide content should contain model, character, and texture assets freely available to O3DE users:
- Assets distributed as part of O3DE.
- Assets distributed with permissive and open source licenses such as those found at The Stanford 3D Scanning Repository .
- Assets that can be quickly replicated in open source content applications such as Blender and Krita .
- If you use assets distributed by a third party, provide a proper attribution and link for the asset in the documentation.
Artful images
Artful images are used for artistic or marketing purposes, such as images that demonstrate output from Atom renderer, or the fidelity of Atom materials.
- Use the PNG format (
.png) or the JPEG format (.jpg) for artful images. - Artful images may be up to UHD resolution (3840x2160).
- Artful images should not exceed 1 MB in size.
- Artful images may contain assets that are not freely available or easily replicated.
Image annotations
- We suggest the open source tool ShareX for image annotation.
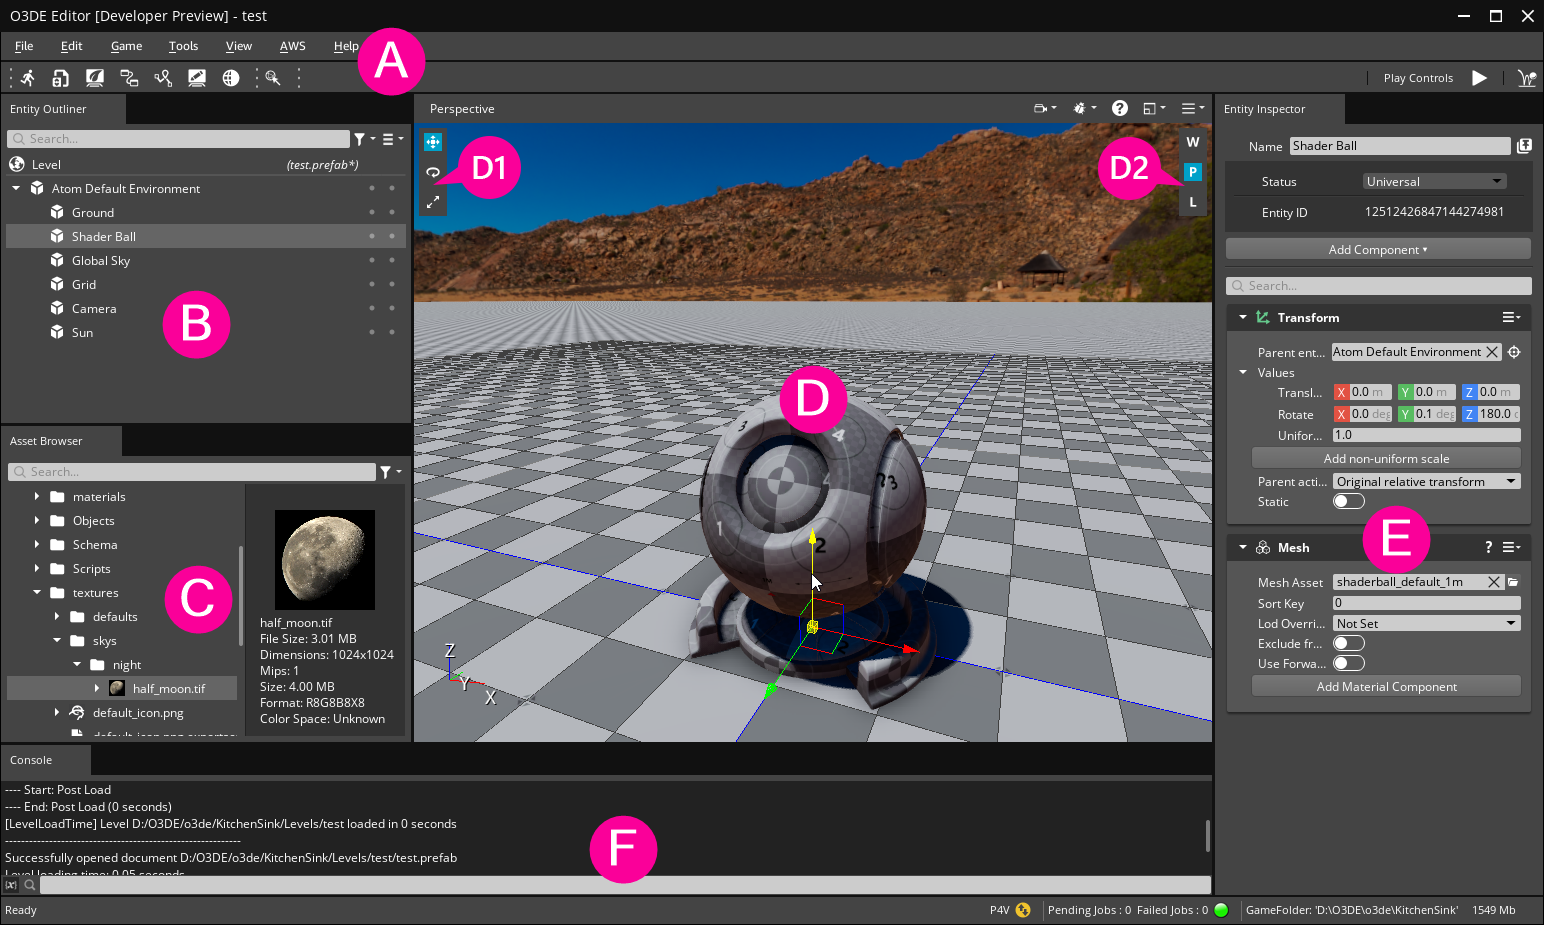
- Use as little text as possible in annotations. Add an ordered list below the image for text explanations of image annotations.
- Use the Open Sans bold font in image annotations.
- Use US English in image annotations.
- Use solid color fills, not gradient fills.
- Avoid colors affected by colorblindness. We recommend using white text and Rhodamine Red C (RGB: 225,0,152 HEX: E10098) for image annotations. See the following annotated image example:

Diagrams
- Use a diagram tool such as draw io to create diagrams.
- Use the SVG format (
.svg) for diagrams. - Keep diagrams simple. Break complex diagrams into smaller chunks.
- Use as little text as possible in diagrams.
- Use the Open Sans font for diagram text.
- Use solid color fills, not gradient fills.
- Avoid colors affected by colorblindness. Be selective about tones of red, green, blue, and yellow.
Animated images
Due to limitations on repository size, animated .gif images are not accepted in contributions. If you must include an animated image in a topic, you may use an .mp4 video. However, if the animation demonstrates a sequence of steps, you might alternatively consider an image strip rather than a video.
Image strips
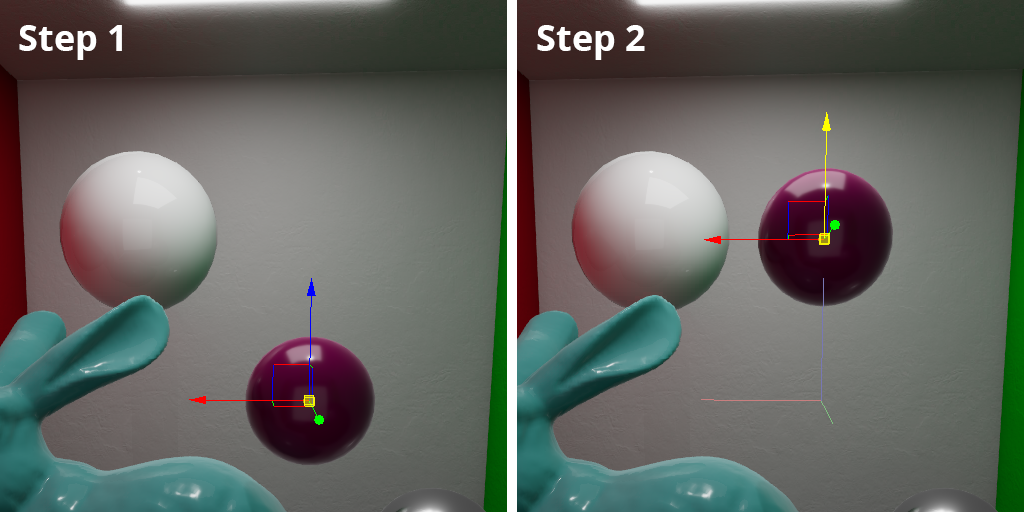
To demonstrate steps, consider using a horizontal two to four panel annotated image strip that demonstrates the start, action, and result of the process. See the example below:

- Left-click on the entity in Perspective to select it.
- LMB+Drag on the transform gizmo’s Z axis to move the entity on the world Z axis.
Embedding videos with the video shortcode
Videos in the /images/ directory can be embedded in topics with the video shortcode. Use this method to include animations in topics rather than animated .gifs.
Keep the following in mind when submitting videos in docs contributions:
.mp4is the preferred video format..oggand.webmare also supported by the shortcode, but aren’t as well supported by various browsers.- Videos must be placed in the
/static/images/directory structure using the same conventions as images. - Videos should be smaller than 512 KB and must not exceed 1 MB in size.
- Ensure text in the video is legible if required.
- Ensure the video resolution is no larger than necessary.
- Ensure the video resolution has an even number of pixels in both width and height.
- Crop and frame the subject of the video appropriately.
- Videos shouldn’t include audio unless required by the example.
- Though a poster image is not required, it is recommended.
Parameters
video requires the following named parameters:
src="/images/<video.mp4>"- Video file path.info="<video description>"- A string describing the video.
video supports the following optional named parameters:
poster="/images/<image.png>"- A static image that displays while the video loads or if the video fails to load. This image should be the same size and aspect ratio as the video.autoplay="true"- The video plays as soon as it loads.loop="true"- The video plays in a loop.width="<video width>"- Scale the video by specifying a width in pixels.muted="true"- Video is muted if an audio track exists.type="video/<mp4 OR ogg OR webm>"- Video type. MP4 is default.
The are two additional options that are always enabled.
preload="auto"- Loads the video with the page.controls- Include player controls for the video.
Examples
Basic
videousage with only the required parameters.{{< video src="/images/contributing/to-docs/TestVideo.mp4" info="This is a test video." >}}Output:
Advanced
videousage with optional parameters to enable autoplay, loop the video, scale the video to 250 pixels, and include a poster image.{{< video src="/images/contributing/to-docs/TestVideo.mp4" info="This is a test video." autoplay="true" loop="true" width="250" poster="/images/contributing/to-docs/TestPoster.png" >}}Output:
Embedding Youtube videos with the youtube-width shortcode
Embed Youtube videos in your page by using the youtube-width shortcode. The youtube-width shortcode is an extended version of Hugo’s built-in
youtube shortcode that allows you to control the size of the embedded video.
youtube-width supports the following double-quoted parameters:
- id
- title
- width (using the default value (50%) is recommended)
Examples
youtube-widthexample without thewidthparameter uses the default valuewidth: 50%:{{< youtube-width id="CQmjAxr7LZs" title="What is O3DE?" >}}Output:
youtube-widthexample with thewidthparameter:{{< youtube-width id="CQmjAxr7LZs" title="What is O3DE?" width="100%" >}}Output:

