Use PostFX Shape Weight Modifier to Modify Camera Exposure
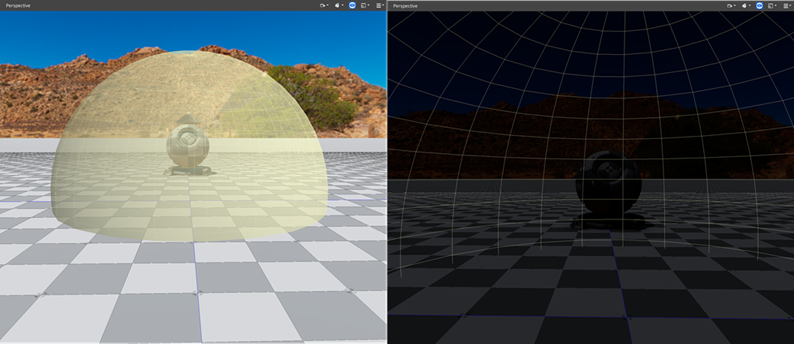
In this example, you will set up a spherical post-processing volume that controls the camera’s exposure. When the camera moves in and out of the volume, its exposure changes.
Post-processing volumes require two entities: one that defines the PostFX and one that defines a PostFX volume. This example uses the following entities:
PostFX: This entity contains an Exposure Control component and a PostFX Layer component that set the default amount of light that the camera receives from the environment.
PostFX Volume: This entity contains a PostFX Shape Weight Modifier component and a Sphere Shape component that define a PostFX volume. It also contains an Exposure Control component and a PostFX Layer component that adjust the camera exposure when the camera moves through the PostFX Volume.
To use post-processing volumes:
In O3DE Editor, create a default level.
Create an entity for the PostFX. Right click in Perspective and select Create entity.
In the new PostFX entity, add the following components:
PostFX Exposure Control
PostFX Layer
In the Exposure Control component, set the Manual Compensation property to
1.0. This sets a default, bright exposure for the camera.Create an entity for the PostFX volume. Right click in Perspective near the Shader Ball entity, and select Create entity.
In the new PostFX Volume entity, add the following four components:
PostFX Exposure Control
PostFX Layer
PostFX Shape Weight Modifier
Sphere Shape
In the Exposure Control component, set the Manual Compensation to
-3.5to lower the camera exposure inside the PostFX volume.In the PostFX Layer component, set the Layer Category property to
Volume. This ensures the Exposure Control component is active inside the volume of the Sphere Shape component.In the PostFX Shape Weight Modifier component, set the Fall-off Distance property to
3.0. This increases the distance of the transition from the default exposure setting to the exposure setting inside the volume, making the transition gradual.In the Sphere Shape component, increase the size of the sphere by setting the Radius value to
3.0. To see a debug view of the volume, click theToggle viewport helpers button in the toolbar in the upper right of Perspective.
Click the
Play Game button in the toolbar or press Ctrl+G, to run the level. Move the camera with the mouse and W, S, A, D. The exposure changes as the camera moves through the PostFX Volume. Press Esc to exit play mode.
The image series below demonstrates how PostFX volumes work in this example. As shown on the left, when the camera is outside of the volume, the scene appears bright. On the right, when the camera enters the volume, the scene darkens.

