IN THIS ARTICLE
Creating a StandardPBR Material
This tutorial walks you through how to create a StandardPBR material in Atom. The StandardPBR material type allows you to create an artist-friendly, full-featured physically based rendering (PBR) material.
This tutorial covers the following concepts:
- The elements of a StandardPBR material
- Creating a material using the Material Editor
- Working with texture files
- Using texture file masks
Before starting
A material can have multiple textures, such as base color, normal map, and roughness. These textures contain different data that are combined to create the overall look of the material. You can design the textures for a material using external tools, such as Substance Designer and Materialize . In this tutorial, we use ready-made materials from Poly Haven .
Download texture files
Download the castle brick material in any resolution from Poly Haven. To download the required maps, click the hamburger button next to the Download button, then choose an extension to use and click the button for that extension next to the AO, Diffuse, Displacement, Normal, and Rough maps. Save the files to disk if they do not download automatically.
After downloading, move the maps to the folder <project-folder>/Materials/PolyHaven/.
We use the following files as our input textures:
- castle_brick_02_red_ao_1k (ambient occlusion)
- castle_brick_02_red_diff_1k (diffuse, base color)
- castle_brick_02_red_disp_1k (displacement)
- castle_brick_02_red_nor_gl_1k (normal)
- castle_brick_02_red_rough_1k (roughness)
Apply a filemask to the texture files
To make sure that these texture files work correctly, you must indicate which texture preset should be used by the Asset Processor to process these files. The easiest way to do this is rename the files to use a texture file mask. A texture file mask is the suffix at the end of a file’s name that indicates which texture preset to use. This allows the Asset Processor to correctly convert this image type into its runtime format.
There are different variations of texture file masks that can work for a single texture. For example, “_ao” or “_ambientocclusion” are both valid and the Asset Processor knows to process the texture as an ambient occlusion texture. These texture file masks are defined in the preset (*.preset) files that configure Atom’s Image Processor. The preset files can be found in the folder /Gems/Atom/Asset/ImageProcessingAtom/Assets/Config/.
We rename the following files to properly apply a filemask. (For the sake of clarity, we use the descriptive texture file mask names.)
- castle_brick_02_red_ao_1k → castle_brick_02_red_ambientocclusion
- castle_brick_02_red_diff_1k → castle_brick_02_red_basecolor
- castle_brick_02_red_disp_1k → castle_brick_02_red_displ
- castle_brick_02_red_nor_gl_1k → castle_brick_02_red_normal
- castle_brick_02_red_rough_1k → castle_brick_02_red_roughness
Create material with Material Editor
To create a material using the Material Editor:
Open the Material Editor. If you are in the Open 3D Engine Editor, go to Tools > Material Editor, or press M. Otherwise, you can open the Material Editor as a standalone application from
<build_folder>/bin/profile/MaterialEditor.exeor<install>/bin/<platform>/profile/Default/MaterialEditor.exe.Create a new StandardPBR material by choosing File > New > Standard PBR. This opens the file browser and prompts you to save the new file. In the Inspector tab, you can verify that the material type is
StandardPBRby checking theMaterial Typeproperty in theDetailsproperty group.Note:The file browser looks for materials in the project folder, any Gem’s Assets folders, or any other folder included in the AssetProcessorPlatformConfig.ini.*Browse and load each texture file into the
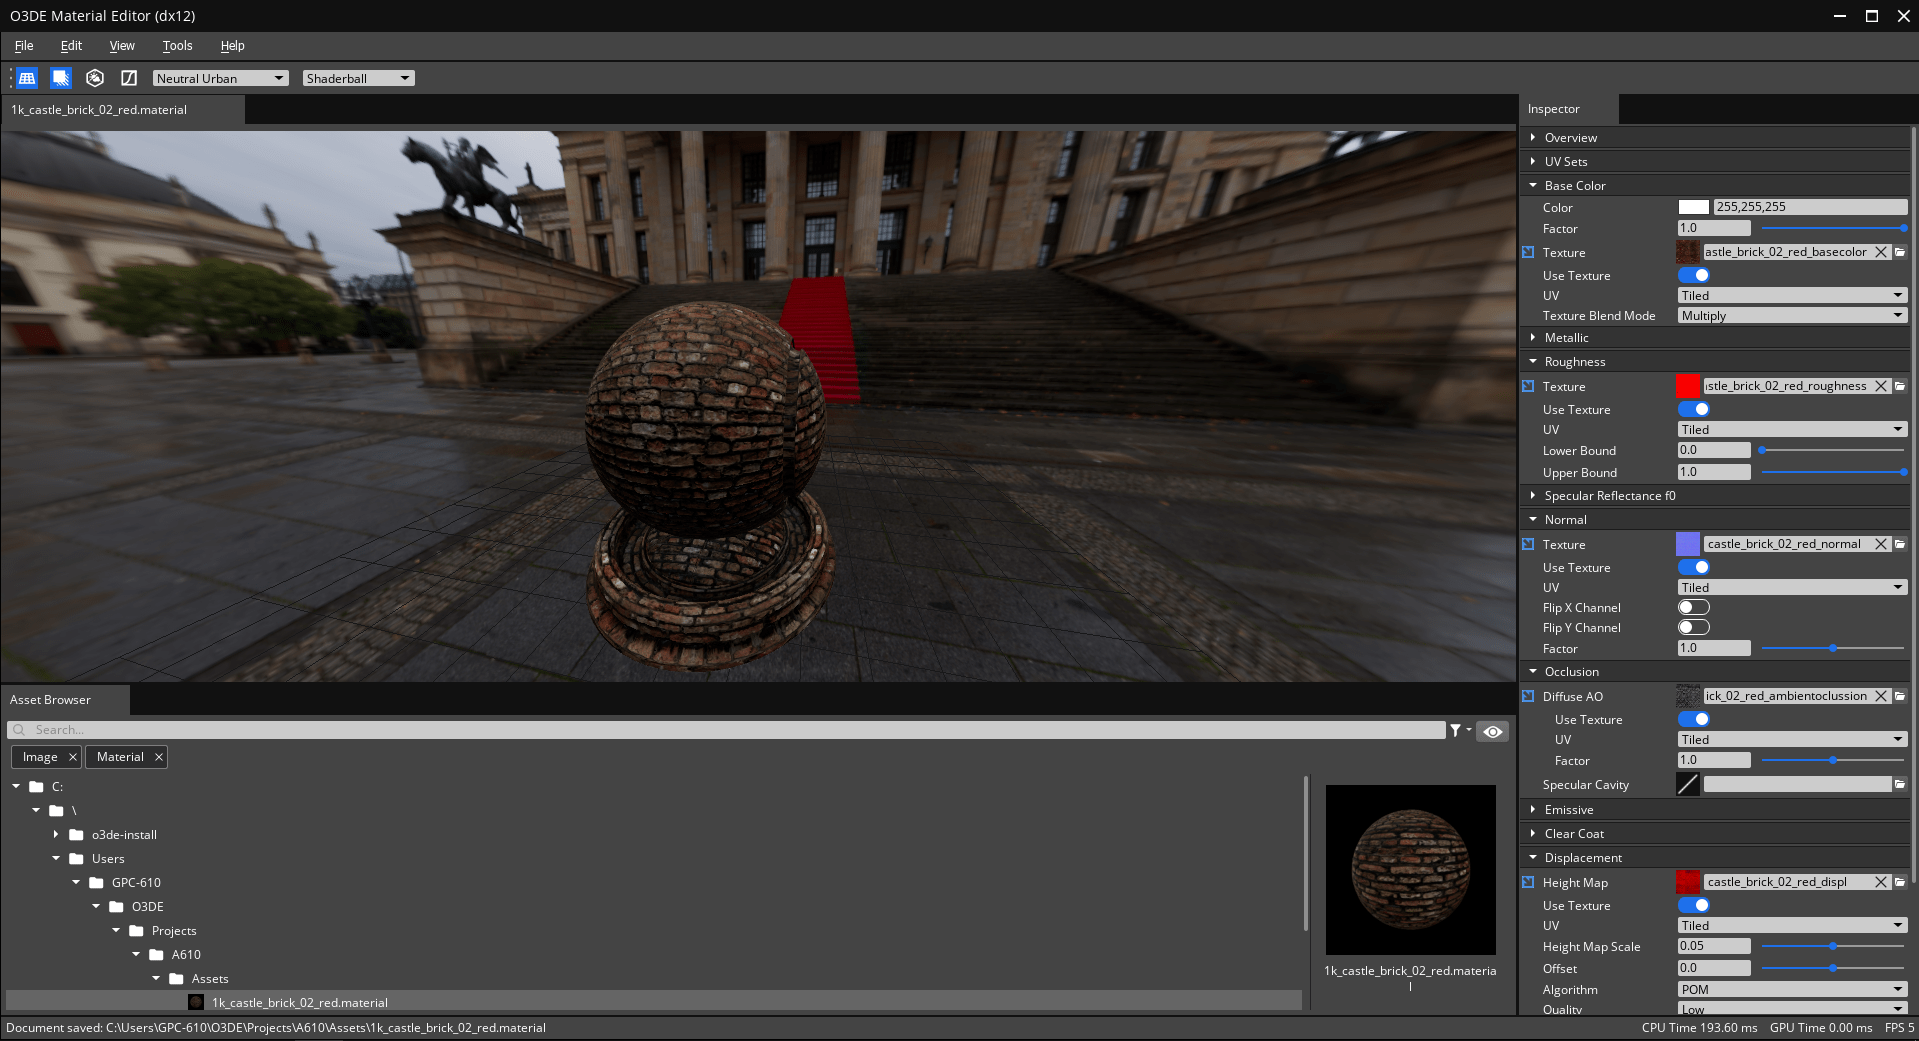
Texture Mapproperty under the texture’s associated property group. Depending on the property group, additional properties might appear so you can further configure the property group.The textures are loaded into their associated property group in the following way.
- Base Color: castle_brick_02_red_basecolor
- Roughness: castle_brick_02_red_roughness
- Normal: castle_brick_02_red_normal
- Occlusion: castle_brick_02_red_ambientocclusion
- Displacement: castle_brick_02_red_displ
Note:The downloaded normal map is flipped. To flip it back, enable theFlip Y Channelproperty.*
You’ve successfully created a new StandardPBR material! The following figure shows the property settings and the expected material.

