IN THIS ARTICLE
Using the Resource Mapping Tool
The resource mapping tool helps manage and configure your resource mappings files.
Prerequisites
Resource mapping tool uses boto3 to interact with backend AWS services. Before using the tool you will need to do the following:
- Set up your AWS credentials. For help, see Configuring AWS Credentials.
- Set AWS Core Project Settings to configure the AWS profile name (if using profiles).
Launching the tool from the Editor
The simplest approach is to launch the tool from the O3DE Editor. Use the AWS - AWS Resource Mapping tool menu item to launch the tool.
The tool can also be run independently of the Editor. See the section Launching the resource mapping tool from command line for instructions.
Importing resources
Do the following to import resources into a resource mapping file for your project.
1. Select the mapping file
Select an existing mapping file to edit, or generate a new mapping file.
To generate a new mapping file
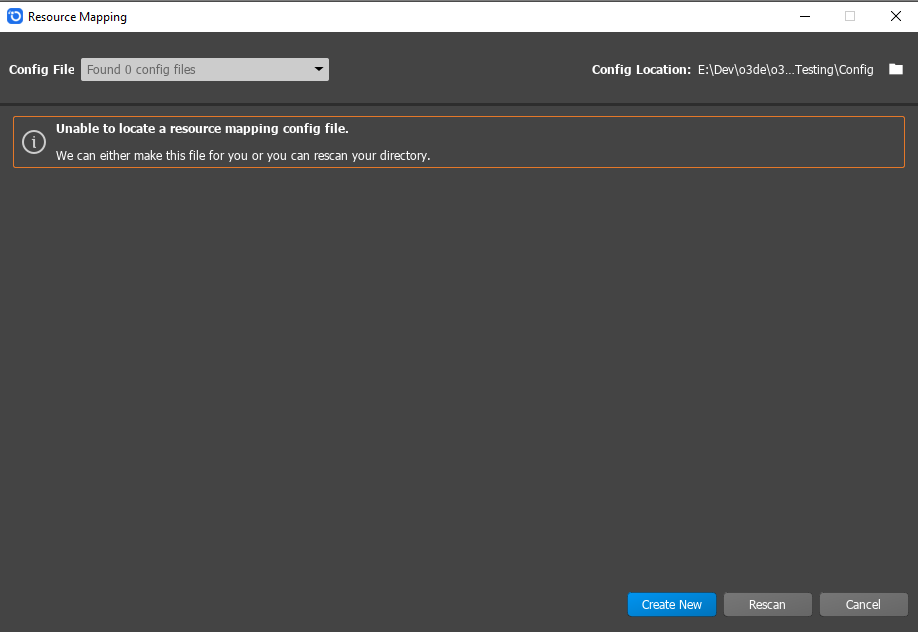
On first launch in a new project, no resource mapping files exist.

Choose Create New to generate a new mappings file. Then use the Config File drop-down box to select the newly created file.
To open an existing mapping file
Use the Config File drop-down box to select an existing mapping file from
2. Import resources
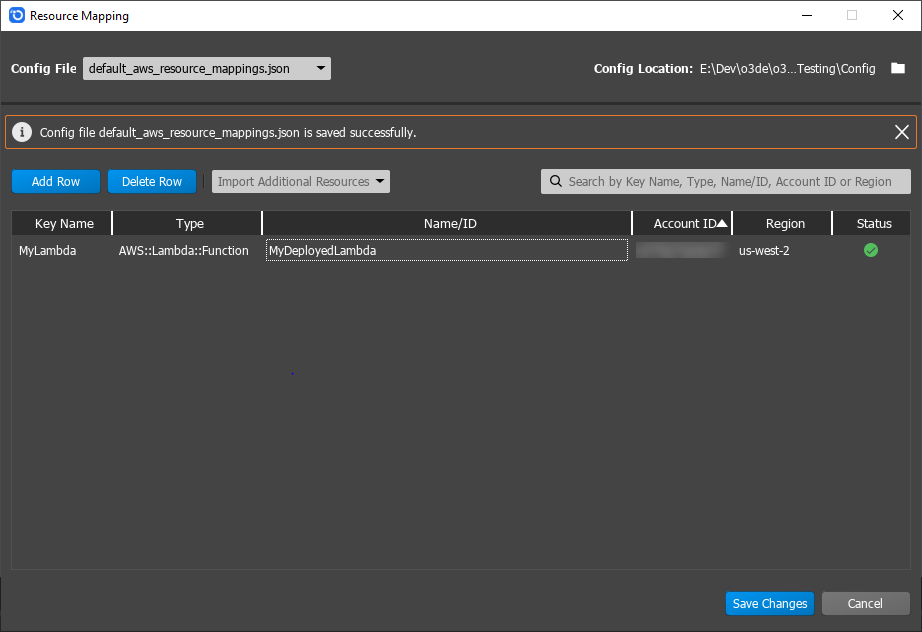
You can add or import resources individually, or import them from an AWS CloudFormation stack.
Importing individual resources

To import a resource deployed in your account
- Open Import Additional Resources.
- Choose Import AWS Resources.
- Select the type of resource to import.
- Choose Search.
- Select the resource(s) to import.
- Set the key name.
- Choose Save Changes to save the file.
To add a resource to a mapping file
- Choose Add Row.
- Add a mapping key name.
- Enter the resource type. Types should be AWS CloudFormation types. Example:
AWS::Lambda::Function. - Provide the Name or ID of the item, such as the Lambda function name.
- Choose Save Changes.
Importing from an AWS CloudFormation stack
To import resources from an existing stack
- Open Import Additional Resources.
- Choose Import CFN Stacks.
- Choose Search to describe the stacks in your account.
- Select the resource(s) to import.
- Import the resources.
- Set the key names for the resources.
- Choose Save Changes to save the file.
Launching the resource mapping tool from command line
You have two options for which Python runtime to use - your own, or the one included with O3DE.
Tool Arguments
--binaries-path[Optional] Path to QT Binaries necessary for PySide, required if launching tool with engine python environment.--config-path[Optional] Path to resource mapping config directory, if not provided tool will use current directory.--debug[Optional] Execute on debug mode to enable DEBUG logging level.--log-path[Optional] Path to resource mapping tool logging directory, if not provided tool will store logging under tool source code directory.--profile[Optional] Named AWS profile to use for querying AWS resources, if not provided tool will usedefaultaws profile.
Option 1: Set up your own Python virtual environment
This project is set up like a standard Python project. The initialization process also creates a virtualenv virtual environment within this project, stored under the .venv directory. To create the virtualenv, you must have a python3 executable (or python for Windows) in your path with access to the venv package. If for any reason the automatic creation of the virtualenv fails, you can create the virtualenv manually.
Open a command prompt to the resource mapping tool directory.
cd <ENGINE_ROOT>\Gems\AWSCore\Code\Tools\ResourceMappingTool
Create a virtualenv.
# Windows
python -m venv .venv

# Mac or Linux
python3 -m venv .venv
Activate your virtualenv.
# Windows
.venv\Scripts\activate.bat

# Mac or Linux
source .venv/bin/activate
Install the required dependencies.
# Windows
pip install -r requirements.txt

# Mac or Linux
pip3 install -r requirements.txt
Launch the resource mapping tool, located in the engine root directory.
python resource_mapping_tool.py
Option 2: Use the Python distribution from O3DE
This option requires a build of your project and the O3DE Editor. Refer to the instructions in README/ located in <ENGINE_ROOT>\Gems\AWSCore\Code\Tools\ResourceMappingTool for details.
Open a command prompt and change the directory to the engine root.
cd <ENGINE_ROOT>
Launch the resource mapping tool, specifying the path to the project’s build folder and to your chosen build configuration.
python\python.cmd Gems\AWSCore\Code\Tools\ResourceMappingTool\resource_mapping_tool.py --binaries_path <PATH_TO_BUILD_FOLDER>\bin\<BUILD_CONFIGURATION>\AWSCoreEditorQtBin
Example using the profile build configuration:
python\python.cmd Gems\AWSCore\Code\Tools\ResourceMappingTool\resource_mapping_tool.py --binaries_path C:\MyProject\bin\profile\AWSCoreEditorQtBin
Troubleshooting
Check the logs
Check the resource mapping tool logs resource_mapping_tool.log that are generated in --log-path you provided while launching tool. If --log-path is not provided, log file is generated in tool source code directory.
If launching tool from Editor, log file is generated in <project-directory>/user/logs/resource_mapping_tool.log
Unable to call a resource
Check the resource mapping file is configured correctly. Ensure the lookup name is defined as expected and it maps to the expected attributes.
Errors of the form Cannot determine region from the url in the logs indicate the wrong region or account has been set for the resource.
- Double check that the resource’s mapping entry has the correct region and account information, if overriding the global region and account attributes.
- Double check that the resource’s mapping entry has the correct resource type and name.
- Ensure the mapping file sets the required global attributes for region and version. Ensure they are set to the expected values.
