IN THIS ARTICLE
AWS GameLift Gem Advanced Topics
This topic covers some advanced ways to use the AWS GameLift Gem.
Use resource mapping files to look up fleets
A GameLift fleet is a set of Amazon EC2 virtual machines, called instances, that represents your hosting resources. A fleet ID is a unique identifier for each fleet, which Amazon GameLift generates.
In most cases, your game will use more than one fleet. To avoid using a fixed fleet ID in your script, you can use a resource mapping file, which lets you look up fleet IDs at runtime. Using a resource mapping file helps keep your code or script clean and consistent. For more information, refer to Resource Mapping Files.
The following examples use Script Canvas, but you can also search and join sessions using the AWS GameLift Gem C++ API.
Example: Create a game session with 1 max player on 1 fleet
This example script shows you how to look up a fleet from a resource mapping file. Then, with the fleet, you create a session that allows one maximum player. (You can also do this example using the AWS GameLift Gem C++ API.)
In Script Canvas, follow these steps:
Create a variable with the
AWSGameLiftCreateSessionRequesttype and name itrequest.Get the
request’s object by using the variable’s getter node.Look up the fleet with the resource key
MyGameLiftFleetIdby using the GetResourceNameId node.Set the
FleetIdof therequest’s object by using the FleetId setter node.Set the max number of players for the
request’s object by using the MaxPlayer setter node.Create a game session by using the CreateSessionAsync node.
Example: Search game sessions across multiple fleets
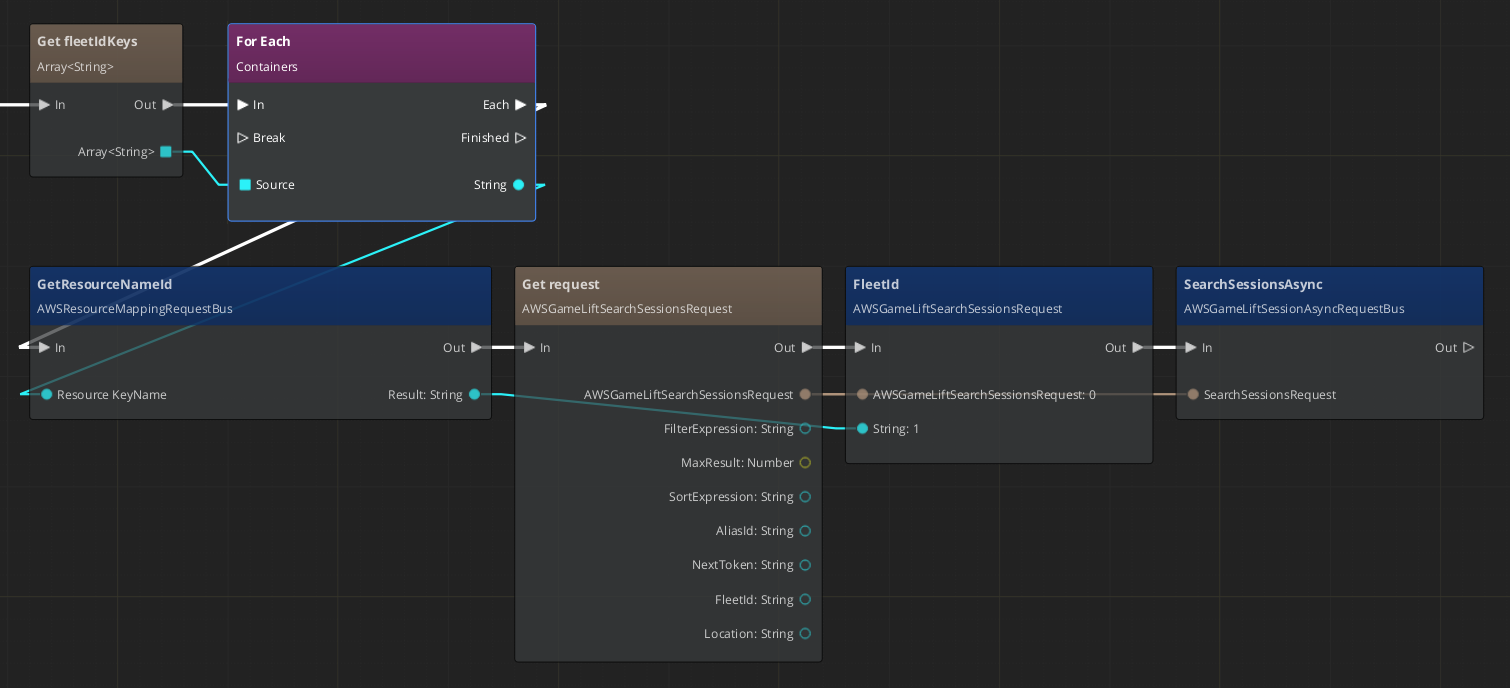
This example script shows you how to search for active game sessions across multiple fleets by using a resource mapping file. If you have multiple fleets, you can store the fleet IDs in an array. Then, you can iterate through each fleet and search for active game sessions in the corresponding fleet. (You can also do this example using the AWS GameLift Gem C++ API.)
In Script Canvas, follow these steps:
Iterate through an array of
FleetIds by using the Get fleetId Keys and For Each nodes.For each fleet ID:
Look up the fleet with the corresponding resource key by using the GetResourceNameId node.
Get the
requestobject by using the variable’s getter node.Set the
FleetIdof therequest’s object by using the FleetId setter node.Search for an active and joinable session in the fleet by using the SearchSessionsAsync node.
Search for and join sessions
The simplest method to search for sessions is by browsing through the server, which shows all of the available games. Then, the player can filter the games based on the type that they want to play, choose a game, and join a session.
The following examples use Script Canvas, but you can also search and join sessions using the AWS GameLift Gem C++ API.
Example: Search for sessions based on filter criteria
This example script shows you how to search for a maximum of 10 sessions in the corresponding fleet.
In Script Canvas, follow these steps:
Create a variable with the
AWSGameLiftSearchSessionRequesttype and name itsearchrequest.Get the
searchrequest’s object by using the variable’s getter node.Look up the fleet with the resource key
MyGameLiftFleetIdby using the GetResourceNameId node.Set the
FleetIdof thesearchrequest’s object by using the FleetId setter node.Filter the
searchrequest’s object by a maximum number of sessions by using the MaxResult setter node.Search for sessions by using the SearchSessionsAsync node.
Example: Browse search results and join session
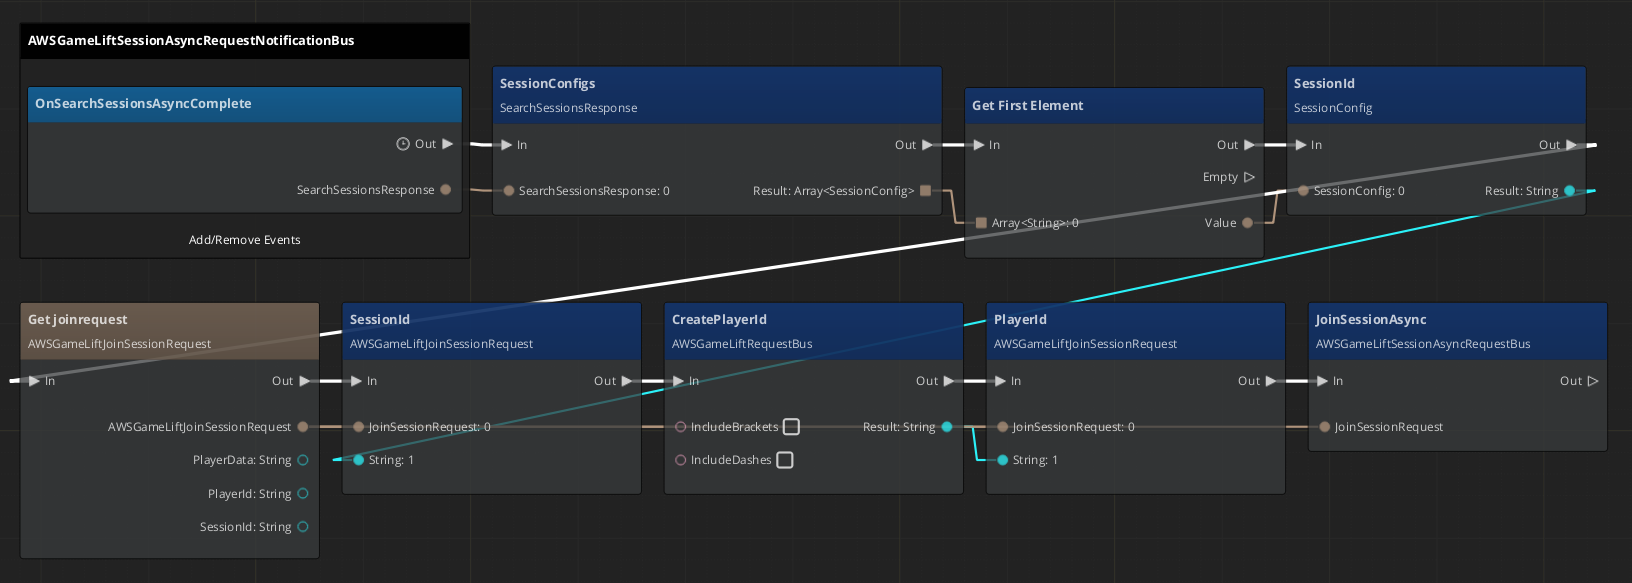
After you get search results from the previous example, this script chooses the first game session and joins it. The script begins automatically after SearchSessionsAsync completes with results.
Create a AWSGameLiftSessionAsyncRequestNotificationBus node. Then set this script to begin automatically after searching for sessions by adding the OnSearchSessionsAsyncComplete event. This returns a
SearchSessionsResponseobject.Get an array of
SessionConfigs from theSearchSessionsResponseobject by using the SessionConfigs node.Get the first
SessionConfigobject from the array by using the Get First Element node.Set the
SessionIdof theSessionConfigobject using the SessionId setter node.Create a variable with the
AWSGameLiftJoinSessionRequesttype and name itjoinrequest.Set the session ID of the
joinrequest’s object to theSessionConfig’s session ID by using the SessionId setter node.Create a player ID for the session by using CreatePlayerId node.
Set the
PlayerIdof thejoinrequest’s object by using the PlayerId setter node.Allow the player to join the session by using the JoinSessionAsync node.
Get credentials from an Amazon Cognito identity pool
If your clients need to interact with AWS resources, you can use temporary AWS credentials that provide limited permissions to your resources. Your clients may need to interact with AWS resources to make requests against GameLift and to permit players to interact with your resources. With the AWS Client Auth Gem, you can use players’ login information to get their AWS credentials from an Amazon Cognito identity pool.
To get players’ credentials from an identity pool, they must successfully log in. After players log in, you can use the AWS GameLift Gem to configure the client and set up their AWS credentials by calling AWSGameLiftClientManager::ConfigureGameLiftClient().
Set up log paths for multiple server processes
You can configure GameLift fleets to run multiple processes on each instance. This can help you use your hosting resources more efficiently and potentially help reduce overall hosting costs. For more information, refer to Managing how game servers are launched for hosting in the Amazon GameLift Developer Guide.
To support logging for multiple processes on the same GameLift instance, enter the following command. You can set a unique log path for a server process by providing a unique identifier in the project-path launch parameter. In this example, log files are saved to C:\game\process1\user\log\ instead of the default log path.
C:\game\bin\server.exe --engine-path=C:\game --project-path=C:\game\process1 --project-cache-path=C:\game\assets -bg_ConnectToAssetProcessor= 0


