UI Text Input Component
You can use a TextInput component to make an element offer player input. This component is typically applied to an element with an image component and two child elements with text components (one for placeholder text and one for input text).
To see in-game examples of completed canvases with the TextInput component, open the level UiFeatures in the project SamplesProject. Press Ctrl+G to play the game, and then choose Components, Interactable Components, TextInput. You can view examples of different types of text input behavior on single lines and on multiple lines. Press Esc to exit the game.
To view these same canvases in the UI Editor, navigate to the \Gems\LyShineExamples\Assets\UI\Canvases\LyShineExamples\Comp\TextInput directory. You can open the following canvases:
Multiline.uicanvas- Examples of editing multiline text stringsSingleLine.uicanvas- Example of editing single-line text strings
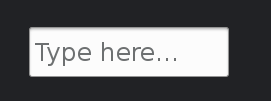
You can add a prebuilt TextInput element from the slice library. When you do this, a text input box, pause-on state, and placeholder text “Type here…” are automatically created in your Hierarchy pane.
To add a TextInput element from the slice library
- In the UI Editor, choose New, Element from Slice Library, TextInput.
To edit a text input component
In the Properties pane of the UI Editor, expand TextInput and do the following, as appropriate:
Interactable
See Properties to edit the common interactive component settings.
Elements, Text
Select an element from the list to provide the text component for the input text. The list shows child elements that have text components.
Elements, Placeholder text element
Select an element from the list to provide the text component for the placeholder text. The list shows child elements that have text components.
Text editing, Selection color
Click the color swatch to select a different color for the selected text.
Text editing, Cursor color
Click the color swatch to select a different color for the cursor.
Text editing, Max char count
Enter the maximum number of characters allowed in the text input box. Type -1 for no character limit.
Text editing, Cursor blink time
Enter a value in seconds. Use 0 for no blink, 1 to blink once every second, 2 to blink once every two seconds, etc.
Text editing, Is password field
Select the box and specify the replacement character.
Text editing, Clip input text
Sets the Overflow mode of the text element to Clip text at runtime.
Actions, Change
Enter a text string. This string is sent as an action on the UI canvas whenever a change occurs in the text input, such as typing or deleting a character.
Actions, End edit
Enter a text string. This string is sent as an action on the UI canvas whenever the player clicks off the text input or presses Enter.
Actions, Enter
Enter a text string. This string is sent as an action on the UI canvas when the player presses Enter.
Cpp
To create your own UI components, check the Working with UI Components page.
Once the component is available in the UI editor; and the UI text input is in the canvas; you can attach the cpp component to it.
Open your component header, include the (1) UiTextInputBus and inherit from (2) UiButtonNotificationBus. In order to listen or handle one and only one address use ::Handler. In order to listen to multiple addresses use ::MultiHandler. The (3) EntityID is required to connect and disconnect the UI element, text input.
#pragma once

#include <AzCore/Component/Component.h>
#include <MyCustomGem/MyCustomExampleInterface.h>
#include <LyShine/Bus/UiTextInputBus.h> // (1) this is the bus

namespace MyCustomGem
{
    class MyCustomExampleComponent: public AZ::Component, public MyCustomExampleRequestBus::Handler,
      private UiTextInputNotificationBus::Handler // (2) , private UiTextInputNotificationBus::MultiHandler
    {
     private:
        AZ::EntityId m_textInputSearch; (3) // reference to the UI-element
/// rest of the code...
Text input has several methods that you can use. If you are not sure which one is of interest to you, consider exploring the api documentation about the class UiTextInputInterface. The following C++ example showcases how you can use one of those methods, GetText.
Inside your cpp file you should (1) connect and (2) disconnect your textinput bus. To evaluate if the event is working as expected, you can print something in the (3) console. Even if you test this in the UI Editor, the messages will appear in your Game-Editor console. Consider adding a UI Button too so you can write in the text input and then print the text in the console when you click the button.
void MyCustomExampleComponent::Activate()
{
    /// rest of the code...
    UiTextInputNotificationBus::Handler::BusConnect(m_textInputSearch); // (1) only one
    //UiTextInputNotificationBus::MultiHandler::BusConnect(m_textInputSearch); // if you expect to add multiple
}
void MyCustomExampleComponent::Deactivate()
{
    /// rest of the code...
    UiTextInputNotificationBus::Handler::BusDisconnect(m_textInputSearch); // (2) only one
    //UiTextInputNotificationBus::MultiHandler::BusDisconnect(m_textInputSearch); // if you expect to add multiple
}

//! TODO: use the code inside this method with another UI trigger, like a button click.
void MyCustomExampleComponent::YourGameLogic()
{
    AZStd::string searchedText;
    UiTextInputBus::EventResult(searchedText, textInputSearch, &UiTextInputBus::Events::GetText);
    AZ_Printf("MyCustomExampleComponent", "searchedText: %s", searchedText.c_str()); // (3) print the searchedText value
}
Lua
In Lua scripting, you can add the script in the UI without any further changes. The TextInputSearch inside the properties table will allow you to reference your text input.
OnActivate and OnDeactivate is usually where you (1) connect and (2) disconnect the bus, using the id of the element you passed as an input param (the TextInputSearch which is an EntityId()).
You can then execute (3) GetText and retrieve the value.
local YourLuaScript =
{
    Properties =
    {
        TextInputSearch =
        {
            default = EntityId(),
			      description = "Element that contains the text input to search"
        },
    }
}

-- this is just an alias
local LO = YourLuaScript;

function LO:OnActivate()
		-- rest of your code...
		self.txtInputTextHandler = UiTextInputNotificationBus.Connect(self, self.Properties.TextInputSearch); -- (1)
end

function LO:OnDeactivate()
  -- rest of your code...
	self.txtInputTextHandler:Disconnect(); -- (2)
end

-- TODO: use the code inside this method inside another UI trigger, like a button click.
function LO:YourGameLogic()
  local searchedText = UiTextInputBus.Event.GetText(self.Properties.TextInputSearch); -- (3)
end