IN THIS ARTICLE
Project Export for Android
This guide covers how to use project export tooling to build and deploy games on Android. We will use the Android export script to generate a Gradle project, prepare assets, and then build the project. The end result of export should be an APK file that can be installed on your Android device, along with an additional step to auto-install on a connected phone.
Note:To learn more about the project export tooling, please consult the page Project Export for Windows and Linux.
Note:To learn more about how to manually export an Android project, please consult the page Generating an Android Project.
Prerequisites
- Make sure that the Project Export for Windows and Linux page prerequisites are satisfied.
- Make sure you have your project created and registered with your engine. Check that you can successfully build and open your project with the Editor.
- Ensure all prerequisites for working with Android in O3DE are satsified. You can learn about software dependencies here and project setup prerequisites here. For the Android SDK, make sure to record where the root folder path is located on your hard drive, as that will be needed for setting up configuration.
- Ensure that you have a proper keystore file configured for signing. You can learn more
here. Here is an example keystore file you can create to start with (you will need the JDK with
keytool):
set KEYSTORE_FILE_PATH=C:\path\to\android-key.keystore
set STOREPASS=o3depass
set ALIAS=o3dekey
set KEYPASS=o3depass
set KEYSIZE=2048
set VALIDITY=10000
set DNAME="cn=o3de-android-project, ou=o3de, o=LF, c=US"
keytool -genkey -keystore %KEYSTORE_FILE_PATH% -storepass %STOREPASS%  -alias %ALIAS% -keypass %KEYPASS% -keyalg RSA -keysize %KEYSIZE% -validity %VALIDITY% -dname %DNAME%
- Make sure the O3DE bootstrap registry is enabled for Android. To do so, go to your O3DE installation and edit the file at
%O3DE_ENGINE_PATH%\Registry\bootstrap.setregso that theassetsfield usesandroid. Like so:
"assets": "android",
- Make sure your project has the right configuration settings for Android. You can use the
android-configureCLI tool to ensure this is setup. To see what is currently configured, run:
$O3DE_ENGINE_PATH/scripts/o3de.bat android-configure -l
You can also validate your current configuration using:
$O3DE_ENGINE_PATH/scripts/o3de.bat android-configure --validate
If you do not already have Android configured, or encounter issues with the validate command, you can run the following:
$O3DE_ENGINE_PATH/scripts/o3de.bat android-configure --set-value platform.sdk.api=30
$O3DE_ENGINE_PATH/scripts/o3de.bat android-configure --set-value ndk.version=25.*
$O3DE_ENGINE_PATH/scripts/o3de.bat android-configure --set-value android.gradle.plugin=8.1.0
$O3DE_ENGINE_PATH/scripts/o3de.bat android-configure --set-value sdk.root=C:/path/to/android/sdk
$O3DE_ENGINE_PATH/scripts/o3de.bat android-configure --set-value signconfig.store.file=C:/path/to/android-key.keystore
$O3DE_ENGINE_PATH/scripts/o3de.bat android-configure --set-value signconfig.key.alias=o3dekey
$O3DE_ENGINE_PATH/scripts/o3de.bat android-configure --set-value asset.mode=PAK
Note: you must already know where sdk.root and signconfig.store.file exist on your hard drive, and use those paths accordingly. To setup the keypass and storepass, you must use the following commands
$O3DE_ENGINE_PATH/scripts/o3de.bat android-configure --set-password signconfig.store.password
$O3DE_ENGINE_PATH/scripts/o3de.bat android-configure --set-password signconfig.key.password
Make sure the passwords supplied here match what you used in the keystore file, and that you remember what they are.
Using Project Manager
Getting Started
To learn more about the export button feature and the export settings panel in the Project Manager in general, click here. This guide will only cover Android specific details.
To kick off Android export, the process is identical to what would be done for Windows or Linux. From your project card, simply open the dropdown menu and click the Android option in the Export Launchers sub-menu. When clicked, after confirming you are ready to proceed, the export should immediately begin.
Assuming there are no errors in your build, the resulting Android Project will appear wherever you specified the Android APK Build Path in the export settings panel.
Export Settings Panel
To access the Export Settings Panel, simply click the “Open Export Settings…” button in the dropdown shown in the previous section. Upon clicking it, you should see the following form.
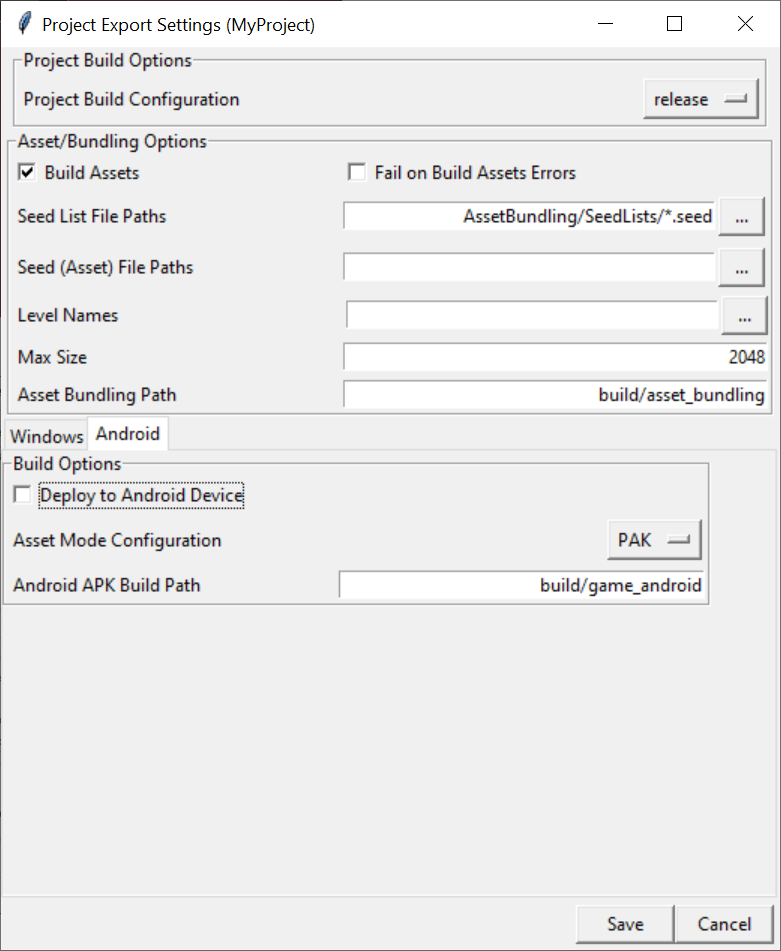
The panel is divided into two main sections. The top half of the panel contains settings that are common across all supported platforms for O3DE. The bottom half contains platform specific settings separated by tabs. In this guide we will focus on the “Android” tab.
The Android specific features are as follows:
- Deploy to Android Device - upon completion of the export process, if you have an Android device connected to your computer (and
adbcan recognize the device), then the exported Android app will be automatically installed onto your device. This can be useful in quickly testing on real hardware. - Asset Mode Configuration - specifies how game assets should be organized inside the APK file bundle. LOOSE means that all files are stored individually, acting like a primitive zip archive. PAK means that all files are combined into a single blob file.
- Android APK Build Path - specifies where the Android project should be generated, which will inform gradle on where to build the final APK.
Note:On some platforms, such as Windows, when trying to export an Android APK project, you may run into an issue with Gradle prematurely failing the export because of something like:
...the filename is too long (exceeds 260 characters)If you encounter this issue, and the Android APK build path is relative to the project folder, you may need to move the folder closer to the root of your hard drive such as
C:/o3de-android.
Using CLI
Running the Export Script
For building in release mode with bundled PAK files for your APK, you can use the following export command:
set O3DE_ENGINE_PATH=C:\path\to\o3de
set PROJECT_PATH=C:\path\to\project
cd %PROJECT_PATH%
%O3DE_ENGINE_PATH%\scripts\o3de.bat export-project -es export_source_android.py -pp . -abp build\game-android -ll INFO --config release --asset-mode PAK
To use profile mode instead, change the --config parameter in the above snippet to use profile instead. If you wish to set the asset mode to LOOSE, use --asset-mode LOOSE.
That invocation should be all that is needed to create an APK file for your project. To install the APK on your phone for testing, this can be done by adding the --deploy-to-android flag in the export snippet above. Please note that to use this feature, you must ensure an android device is connected to your computer, and that ADB is able to properly access the device.
As a result of the export process, the resulting Android Gradle project folder was also generated. You can find it in %PROJECT_PATH%\build\game-android. You can use this project folder from inside Android Studio to tweak any specific settings, or run the Debugger.
Android Export Script
O3DE ships with an Android Export Script , capable of generating an Android Gradle project folder to handle standard use cases of O3DE projects on Android.
The export script has two primary sections: the function
export_source_android_project and the
startup code that only runs if the script is invoked by the CLI. In-depth discussion on these two sections can be found in the
Developer Guide.
Usage
To use the export script, you can issue the arguments at the same time that you are running the export-project command. The arguments specific to the script will be deferred until it begins running.
The arguments are as follows:
| Argument Name | Description | Required? |
|---|---|---|
--script-help | Display the help information specifically for the export script. | no |
--config | Defines the CMake build configuration when building the project’s binaries, such as GameLauncher. Options are either profile or release. | no |
--tool-config | The CMake build configuration to use when building tool binaries. Options are either profile or release. | no |
--build-assets | Override the default behavior to include processing all assets and run the asset bundler for the project. This option is available when the export-project-configure defaults for option.build.assets is False. | no |
--skip-build-assets | Override the default behavior to skip reprocessing and rebundling of all assets for the project. This option is available when the export-project-configure defaults for option.build.assets is True. | no |
--fail-on-asset-errors | Override the default behavior to fail the export process on any errors that occur during asset processing. This option is available when the export-project-configure defaults for option.fail.on.asset.errors is False. | no |
--continue-on-asset-errors | Override the default behavior to ignore any errors that occur during asset processing and continue with the project export. This option is available when the export-project-configure defaults for option.fail.on.asset.errors is True. | no |
--seedlist | Path to a seedlist file for asset bundling. You can specify this multiple times for multiple seed lists. This parameter also allows for wildcard matching for paths. | no |
--seedfile | Path to a seed file for asset bundling. Example seed files are levels or prefabs. You can specify this multiple times for multiple seed files. This parameter also allows for wildcard matching for paths. | no |
--level-name | The name of the level you want to export. This will look in <o3de_project_path>/Cache/levels to fetch the right level prefab. Specify multiple times for each level in your game. This is not necessary if the level is already defined inside of a seed list. | no |
--build-tools | Builds the O3DE toolchain executables if the engine is not an SDK. This will build AssetBundlerBatch, AssetProcessorBatch. This option is available when the export-project-configure defaults for option.build.tools is False. | no |
--skip-build-tools | Skips building the O3DE toolchain executables if the engine. This may be useful if you already have the tools available. This option is available when the export-project-configure defaults for option.build.tools if True. | no |
--tools-build-path | Designates where the build files for the O3DE toolchain are generated. If not specified, default is <o3de_project_path>/build/tools. | no |
--max-bundle-size | Specify the maximum size of a given asset bundle. | no |
--android-build-path | Designates where the Android Gradle project folder for the project is generated. If not specified, default is <o3de_project_path>/build/android. | no |
--quiet | Suppresses logging information unless an error occurs. | no |
Here is an example usage of this script:
set ANDROID_OUTPUT_PATH=C:\path\to\android\build\path
%O3DE_ENGINE_PATH%\scripts\o3de.bat export-project --export-script %O3DE_ENGINE_PATH%\scripts\o3de\ExportScripts\export_source_android.py --project-path %PROJECT_PATH% --android-build-path %ANDROID_OUTPUT_PATH%
O3DE_ENGINE_PATH, O3DE_PROJECT_PATH and ANDROID_OUTPUT_PATH are environment variables. The O3DE_ENGINE_PATH and O3DE_PROJECT_PATH variables point to the path locations for your o3de source engine and o3de project respectively. The ANDROID_OUTPUT_PATH variable corresponds to the folder path where you would like for the generated Android Gradle project folder to appear.