IN THIS ARTICLE
Code Gem Specifications
Code Gems contain source code that can extend the Open 3D Engine (O3DE) Editor or integrate features and logic for your O3DE project. They can also contain assets that are required by the source code such as interface elements and assets that are used as tests and samples.
Creating a Gem
Follow Create an O3DE Gem to create a Gem based on the DefaultGem template. Code and asset Gems have the same Gem directory structure and you can use the same command to create them.
Gem code
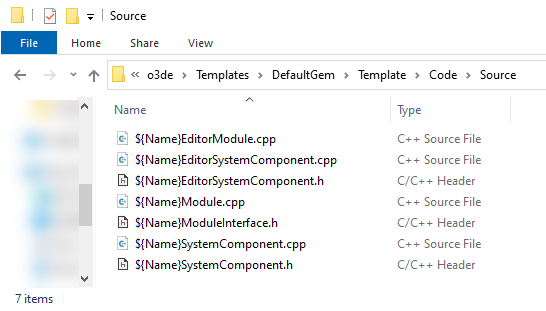
The code components of a Gem are located in the Code directory. The DefaultGem template provides the following boilerplate code in the Code/Source directory of your Gem.

You can browse the Gem’s source code from a Gem that you created or from the DefaultGem template that’s located in the Templates/DefaultGem directory of your engine source code.
The following files are the code components of a Gem.
<Gem>ModuleInterface.h, <Gem>Module.cpp
The <Gem>ModuleInterface is the main Gem AZ::Module class that contains the entry point functions to connect the Gem’s functionality to O3DE. The DefaultGem template already sets up the Gem module to connect to O3DE by calling the AZ_DECLARE_MODULE_CLASS macro.
For more information on modules and their responsibilities in O3DE, refer to the overview of the Gem Module System.
<Gem>SystemComponent.cpp, <Gem>SystemComponent.h
The <Gem>SystemComponent class is a global singleton class that’s responsible for managing the Gem’s code. The Gem module registers the Gem System Component which manages the Gem module’s life cycle: initialization, activation, and deactivation. The Gem System Component activates when the Gem loads and deactivates when the Gem unloads.
The Gem System Component allows the component within the Gem module to communicate with components from other Gems by connecting to their EBus. It also handles initialization and shutdown, events, memory allocation, and debugger connections.
<Gem>EditorModule.cpp
The <Gem>EditorModule class contains the logic for using the Gem in the Editor. It’s separate from the main Gem module, which handles the logic of the Gem. For example, if the Gem implements a component, the main Gem module implements the component’s logic and the Editor module implements the component’s user interface in the Editor.
<Gem>EditorSystemComponent.cpp, <Gem>EditorSystemComponent.h
The <Gem>EditorSystemComponent class is the system component class for managing the Editor module. You can use this class to program Editor functionality. For example, if your Gem implements a component or a window that appears in the O3DE Editor.
Building a Gem
Prerequisites
You must register your Gem before you can build it.
If you created a Gem using the
create-gem command in the o3de script, it is registered automatically.
For more information on registering Gems to a project, refer to Registering Gems to a Project.
Building a Gem using the command line
After a Gem is registered to an engine, project, or the global o3de_manifest.json, you can build the Gem using CMake, the same way that you
build the engine and projects. Gems that are
added to a project build automatically when you build the project. While developing a Gem, however, you may want to build it individually to avoid rebuilding the entire project.
To build a Gem individually, in the directory that is appropriate for your
engine’s build type, use the cmake --build command and specify the build solution and configuration. Use the --target flag to specify the Gem modules that you want to build: <Gem Name> for the main Gem module and <Gem Name>.Editor for Editor modules. If your Gem contains static libraries, you may also include them in the list of targets to build.
The following example shows the command to build both the Editor and main Gem modules for a Gem named MyGem:
cmake --build build/windows --target MyGem.Editor MyGem --config profile -- -m
When you build a Gem, the build system also builds the Gem’s dependencies that are listed in the Gem’s code/CMakeLists.txt file.
Building a Gem in Visual Studio
Open the Visual Studio build solution that is appropriate for your engine’s build type. For source engines, this is the engine’s root directory, and for pre-built SDK engines, this is the project’s root directory.
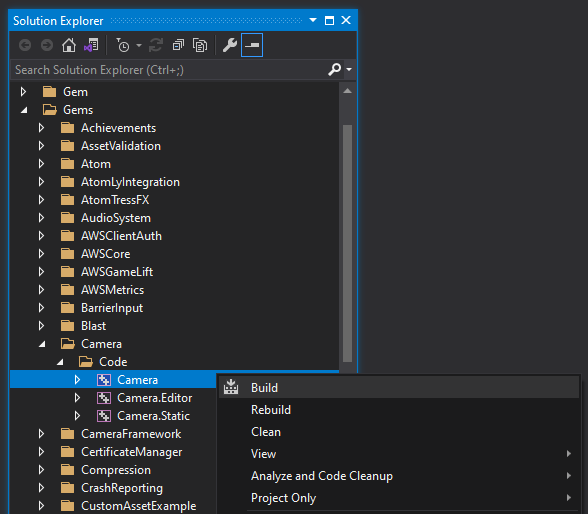
Find your Gem’s
Codedirectory in the Solution Explorer. In most cases, this directory is located atGems\<MyGem>\Code. This directory contains all of your Gem’s build targets, including the main<MyGem>and Editor<MyGem>.Editormodules.Ensure that the correct build configuration is selected in the top toolbar. For information about build configurations, see Generated build configurations.
Right-click on a module and select Build from the menu to build the module.

