IN THIS ARTICLE
Using Actor LODs to Optimize Performance
You can use levels of detail ( LODs) to optimize performance in Open 3D Engine (O3DE). Actor LODs have progressively simplified meshes, skeletons, materials, and textures as the actor moves away from the camera.
Actors in O3DE can have up to six LODs including the base mesh. LOD0 is the base mesh that is displayed when the actor is closest to the camera. It has the highest fidelity meshes and textures, and the most complex skeleton and materials. LOD5 has the lowest fidelity and is displayed when the actor is furthest from the camera. Each successive LOD typically has fifty percent fewer vertices than the previous level, the skeleton might be optimized by removing leaf bones, materials and textures might be consolidated and simplified, and animation sample rates might be reduced.
Features
O3DE provides the following support for Actor LODs:
- Mesh LODs can be manually assigned in Scene Settings, automatically assigned by naming convention, or automatically processed from LOD Groups in the source asset.
- Skeleton LODs can be manually assigned in Scene Settings, automatically processed from LOD Groups in the source asset, or automatically generated based on skin weight data.Note:Skeleton LODS can’t be automatically assigned by naming convention.
- Material and texture LODs are created by assigning simplified materials and textures to the appropriate mesh LODs.
- The Simple LOD Distance component supports setting max view distances and max animation sample rates per LOD.
Guidelines
LODs can be used in a few different contexts in O3DE. The following guidelines are important considerations for actor LODs in particular. For additional information about creating actor assets, refer to the Scene Source Asset Best Practices topic for actor assets.
LOD meshes
- Each LOD mesh must be bound to a skeleton.
- LODs are not required to have the same number of meshes. With each successive LOD, meshes can be combined and consolidated. A character might have a dozen meshes at LOD 0 and, through a process of consolidation and simplification, a single mesh at LOD 5.
- There are no requirements for naming meshes, but it’s recommended that you use names that make the mesh’s intended LOD easy to determine.
- To have meshes automatically assigned to LODs, use the appropriate postfix (
_lod1,_lod2, and so on), or use LodGroups in the source scene file. Both methods are explained in following sections of this topic.
Skeletons
- LODs can use the same skelton or have an optimized skeleton for each LOD.
- The only allowed optimization for skeleton LODs is to remove leaf bones, which are the bones at the end of a chain. Bones can’t be removed from within the skeleton hierarchy. For example, a character might have fewer finger bones, and fewer fingers, as the skeleton is optimized for each successive LOD. To remove leaf bones for optimization, start from the outermost leaf bones, and work back up the skeleton hierarchy.
- Each skeleton LOD must have the same bone names and hierarchy, excluding leaf bones removed for optimization.
- If you choose to create skeleton LODs in a digital content creation (DCC) application, you must assign them to LODs through LodGroups in the source file, or manually assign LODs in Scene Settings.
Materials and textures
- LODs can share materials and textures, or have unique materials and textures.
- Materials and textures are assigned to the individual meshes of each LOD.
Manual LOD setup with Scene Settings
Mesh and skeleton LODs can be configured manually in Scene Settings. Manual setup can be challenging with complex actors, however, so using LodGroups to automatically generate actor LODs is recommended. To set up actor LODs manually, do the following:
Manually set mesh LODs
In Scene Settings, select the Meshes tab.
In the Mesh Group, choose the
node select button to open the scene node list.
In the node list, select only the mesh nodes that should be included in the highest level mesh LOD. Choose Select to complete the selection and close the list.
Choose Add Modifier and select Level of Detail from the modifier list.
In the Level of Detail modifier, choose the
to add a mesh LOD. Add up to five mesh LODs as required.
For each mesh LOD, choose the
node select button to open the scene node list, and select the mesh nodes to include in the LOD.
Manually set skeleton LODs
In Scene Settings, select the Actors tab.
Choose Add Modifier and select Skeleton LOD from the modifier list.
In the Skeleton LOD modifier, choose the
to add a skeleton LOD. Add as many skeleton LODs as required.
For each skeleton LOD, choose the
node select button to open the scene node list, and select the bone nodes to include in the LOD.
Note:You aren’t required to build or manually set-up skeleton LODs to use actor LODs. In most scenarios, an actor can use the same base skeleton for each LOD, or optimized skeletons can be automatically generated for each LOD based on skin weight information. It’s only recommended to manually assign skeleton LODs in scenarios where LodGroups or automatic skeleton LOD generation does not yield desired results.
When you’ve assigned all the meshes and bones to the appropriate LODs, choose Save at the bottom of the Scene Settings window to save your preferences and automatically process the actor with its LODs.
Automatic LOD setup with LodGroups
LodGroups are created in a digital content creation (DCC) application such as Maya or Blender by arranging the meshes and skeletons for each LOD in a hierarchy of groups. LodGroups are automatically processed and don’t require additional configuration in Scene Settings.
An LodGroup node specifies that its child groups each contain an LOD. Maya has a special LOD Group tool that can be accessed from the edit menu to create LodGroups. In other applications, such as Blender , you can create LodGroups by doing the following:
In Blender, create an empty (transform) node. Name the node
LodGroup.The LodGroup node uses a special string property to notify Asset Processor that its child nodes contain LODs. Add a custom property to the LodGroup node with the following attributes:
- Type -
String - Name -
fbx_type - Value -
LodGroup
- Type -
Create up to six additional empty nodes (one for each desired LOD) as child nodes of the LodGroup node.
Name the nodes accordingly, for example
LOD0,LOD1, and so on.Place the appropriate LOD meshes and skeletons beneath each LOD node. The highest resolution meshes and skeletons, for example, are placed under LOD0. The next highest fidelity meshes and skeletons are placed beneath LOD1, and so on.
Export a source scene asset in FBX or GLTF format.
Place the source scene asset somewhere in your project’s directory structure such as the
Assetsdirectory. Asset Processor automatically detects and processes the actor and its LODs.
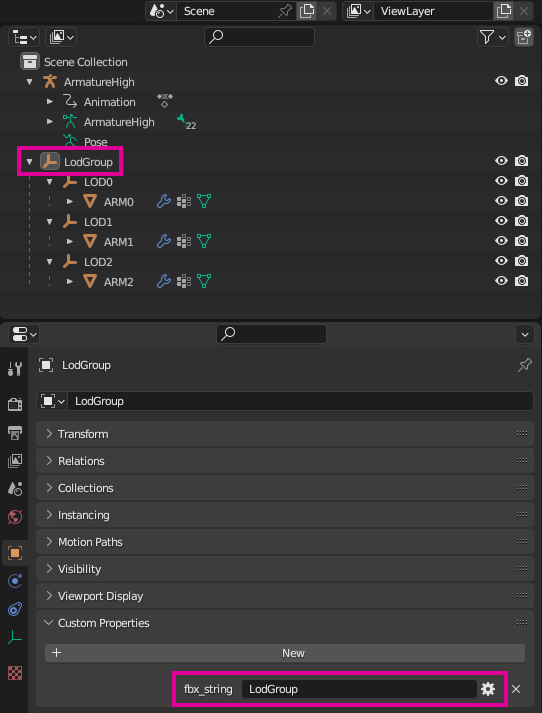
The following image demonstrates an example LodGroup setup in Blender. Note the custom string property applied to the LodGroup node. There are three child LOD nodes that each contain a version of an ARM mesh. The skeleton (ArmatureHigh) is used for all LODs, so the skeleton is not included in any specific LOD. To create skeleton LODs for LodGroups, refer to the previous guidelines on creating LOD skeletons. Skeleton LODs are added to each LodGroup with their corresponding meshes.

Automatic mesh LOD assignment
Mesh LODs can be automatically assigned through naming convention.
Create an actor with multiple LOD meshes. Each LOD can have as many meshes as required. For example, LOD0 might have dozens of high resolution meshes. Through a series of consolidations and optimizations, LOD5 might have a single mesh.
For each mesh in an LOD, add the appropriate LOD postfix (
_lod0,_lod1,_lod2, and so on).Export a source scene asset in FBX or GLTF format.
Place the source scene asset somewhere in your project’s directory structure such as an Assets directory.
Open the asset is Scene Settings.
Verify that the appropriate number of mesh LODs have been added, and that the correct meshes are assigned to each LOD.
Choose Save to save your options and automatically process the actor.
For more information, refer to the Level or Detail (LOD) modifier topic in the Scene Settings feature documentation.
Automatic skeleton LOD optimization
Skeleton LODs can be automatically created using the Skeleton optimization modifier applied to an Actor group in Scene Settings. The Skeleton optimization modifier creates skeleton LODs by removing leaf bones that aren’t skinned to a mesh. This process requires special attention to the skin weights of each mesh LOD.
In a DCC application, create a series of mesh LODs for your actor.
When skinning each mesh LOD, pay close attention to which bones are influencing the mesh vertices. You must ensure that fewer and fewer leaf bones influence the mesh in lower level LODs. Consider the following, for example:
At LOD0, a character mesh has a complete set of individual fingers with 3 bones per finger.
At LOD1, the meshes for the middle, ring, and pinky fingers are fused together. They are skinned to the middle finger bones. The ring and pinky finger bones are not influencing any mesh vertices, and can be automatically removed by Skeleton optimization.
At LOD2, all the finger meshes are fused together, and are skinned to the index finger bones. The middle, ring, and pinky finger bones are not influencing any mesh vertices, and can be automatically removed by Skeleton optimization.
At LOD3, the hand model is loosely closed fist, and is skinned to the hand bone. The finger and thumb bones are not influencing and mesh vertices, and can be automatically removed by Skeleton optimization.
Export a source scene asset in FBX or GLTF format.
Place the source scene asset somewhere in your project’s directory structure such as the
Assetsdirectory.Open the asset is Scene Settings.
Select the Actors tab.
In the Actor group choose Add Modifier and select Skeleton optimization from the modifier list.
Ensure the Auto Skeleton LOD property is enabled.
Choose Save to save your options and automatically process the actor.
Set actor LOD distances
Actor LOD distances are set using the Simple LOD Distance component. To set actor LOD distances, do the following:
Ensure your actor asset has mesh LODs (and skeleton LODs if required) created through the processes in the preceding sections.
Instance an actor asset in your level by dragging the actor asset from Asset Browser into the viewport.
Add a Simple LOD distance component to the actor entity.
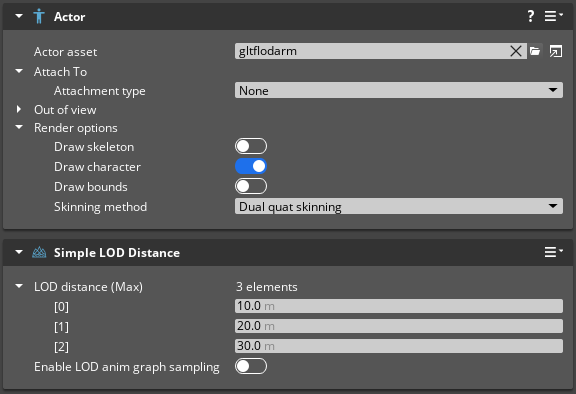
The Simple LOD distance component automatically populates the LOD distance (Max) list with one entry for each LOD in the actor. Each entry represents a distance in world units (meters) from the camera. Set the distance for each LOD as desired.
 Note:You can also create animation LODs by enabling the Enable LOD anim graph sampling property and setting an animation sample rate (samples per second) for each actor LOD. Lower values perform fewer samples and can improve performance for lower actor LODs.
In the viewport, focus on the actor and use the mouse wheel to zoom in and out. The displayed actor LOD changes based on the actor’s distance from the camera.
