IN THIS ARTICLE
Introduction to O3DE Editor
O3DE Editor is your primary workspace. From here, you can access all of the tools to design, create, test, and deploy your project. If you have used other professional engines or 3D animation packages, you’ll find the user experience familiar and adapt to O3DE Editor quickly.
You can learn the basics of navigating and customizing O3DE Editor from the quick video tutorial below, and a few additional tips by reading this topic.
Launch O3DE Editor
O3DE Editor can be launched by opening the shortcut placed on your desktop during installation, or by launching the Editor.exe application from your O3DE build or installation directory (example: o3de/<version>/bin/Windows/profile/Default). You’re greeted by Project Manager which allows you to choose or create a project. When you choose a project, O3DE Editor launches, and you’re given the option to create a new level or load an existing level. Levels aren’t just environments. Levels are complex assets with many files that represent a section of your project. In general, levels are stored in named subdirectories of the project’s Levels directory.
O3DE Editor default layout
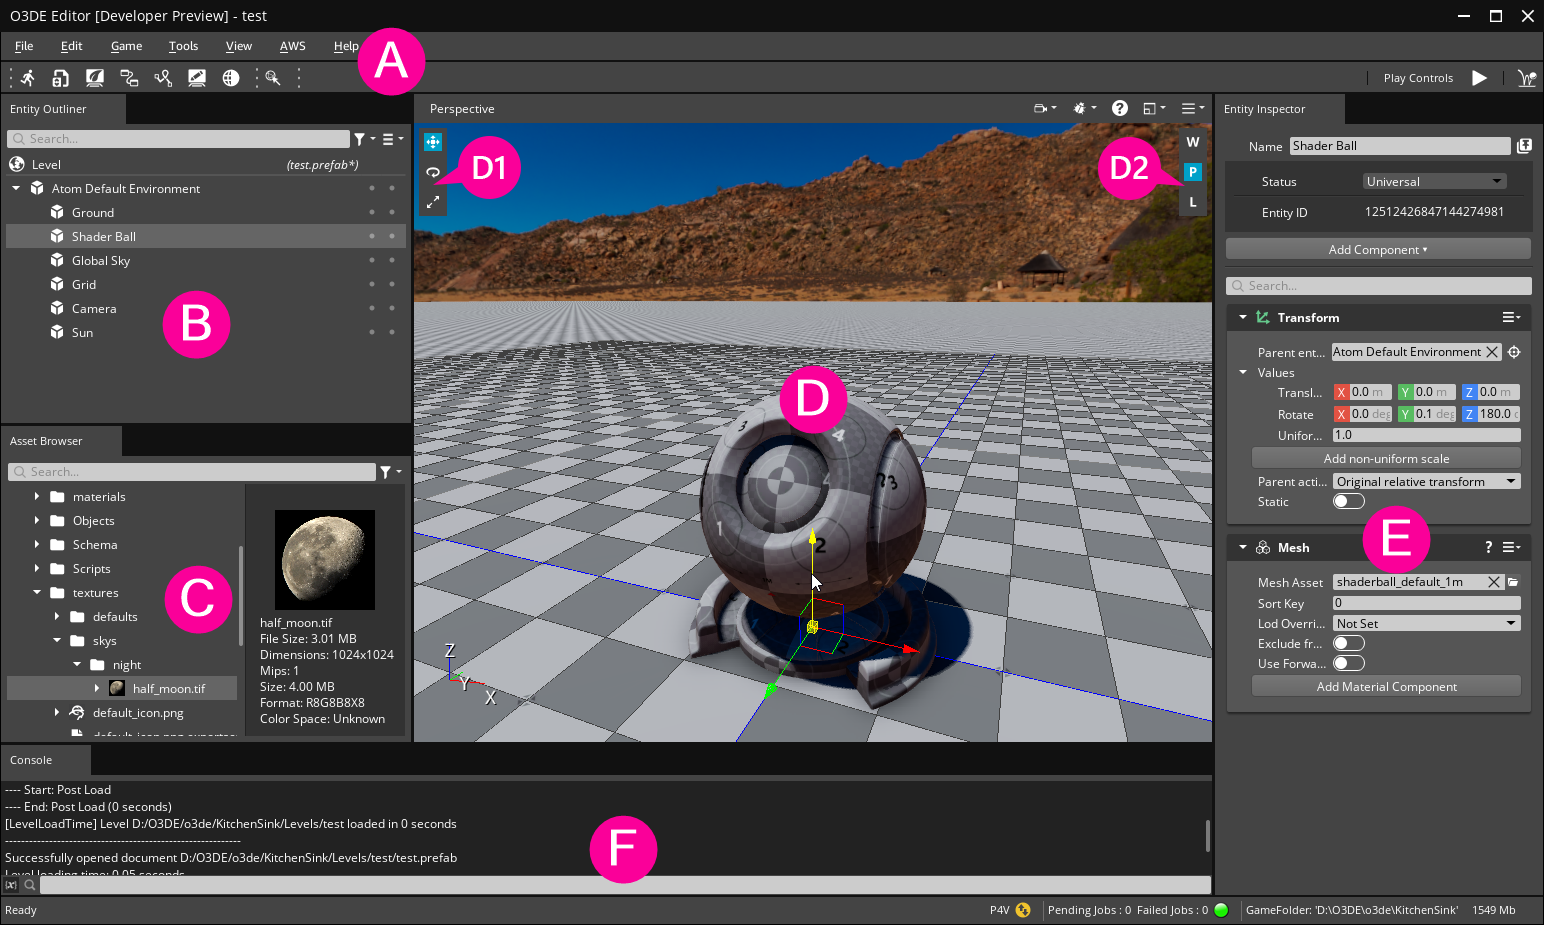
The default layout of O3DE Editor contains the most commonly used tools in a configuration, similar to other content creation applications. The core workflow of O3DE is to create and place entities in a level, so the default layout contains a menu bar, toolbars, panes, and tool tabs focused on entity creation and placement.
You can customize the layout through drag and drop, and save to a custom layout through the Layouts option in the View menu of the main menu bar. Drag the separator bars between panes to resize the panes. Drag the title bar of a pane to tear off the pane. The pane can be dropped anywhere in the layout or dropped outside of O3DE Editor as its own window. To restore the default layout, in the main menu bar choose View > Layouts > Default Layout.

A: Near the top of O3DE Editor are the Menu Bar and the Tool Bar.
The Menu Bar contains several familiar menus:
File - File menu items include actions for opening and saving levels, managing editor and project settings, and creating and opening projects.
Edit - Edit menu items include actions for working with selections such as duplicate, delete, hide and show selection, and working with selection transforms.
Game - Game menu items include actions for running the project, enabling in-editor simulation, enabling and refreshing audio, and debugging.
Tools - Tools menu items provide access to all of O3DE’s tools and editors.
View - View menu items include actions to configure both the Perspective viewport and O3DE Editor layout.
AWS - AWS menu items include tools and links to documentation for working with AWS in your O3DE projects.
Help - Help menu items provide links to O3DE community and documentation resources.
The Tool Bar provides easy access to various editor tools and features. On the left are buttons to open various O3DE tools and editors, on the right are controls to run your project or activate in-editor simulation. The Tool Bar is docked at the top of the editor by default, but you can also dock it vertically on the edges of the editor. To customize the toolbar, right-click anywhere on the toolbar and select Customize from the context menu. You can choose which toolbars to include, and add commands to the toolbar.
B: On the left side of O3DE Editor, Entity Outliner displays a list of entities and prefabs in the current level. Right-click in Entity Outliner to open the context menu to create entities and instantiate prefabs. When an entity or prefab is selected in Entity Outliner, the context menu also has options to duplicate or delete entities, find selected entities and prefabs, organize the list, and open the properties for the selected entity or prefab.
C: Below Entity Outliner is Asset Browser, which you can use to browse your project’s on-disk assets. Assets such as meshes, animations, and textures are created in third-party applications. Assets such as materials, scripts, and prefabs are created in O3DE Editor, or in editor tools such as Script Canvas. The assets that you create are stored in your project directory. You can also browse default assets that are included with O3DE, as well as assets that are included with Gems that have been added to your project.
The left pane of the Asset Browser displays a directory structure that you can browse for available assets. When an asset is selected, the preview pane on the right displays a thumbnail preview and information about the asset, if available.
With an asset selected in Asset Browser, the right-click context menu has options to open Scene Settings where you can set Asset Processor options for the asset, as well as open the asset in an associated application such as a modeling program, or open the file location in the system file browser.
D: In the center of the default O3DE Editor layout is Perspective. This 3D viewport is a real-time view of your level. In Perspective, you create and place entities, and view and play your project.
Right-click in the title bar of Perspective to open the perspective menu. From the perspective menu, you can toggle visibility for various helpers such as the construction plane, icons, bounds, and guides. You can also select an aspect ratio, view through various cameras placed in the level, create new cameras from the current view, and split Perspective into multiple views.
On the right side of the Perspective title bar are several icons to select cameras, set camera movement speed, set information display, enable view icons, set aspect ratio, and set grid snapping options.
Right-click in the viewport of Perspective to open the context menu to create entities and prefabs. Much of the context menu functionality in Perspective is shared with the context menu functionality of Entity Outliner.
In the upper left and upper right corners of Perspective are icon trays for manipulating entities. On the left (D1), you can use the icons to select a transform operation. From top to bottom the icons represent
translate,
rotate, and
scale operations. On the right (D2), you can use the icons to select a space for the transform operation. From top to bottom the icons represent
world,
parent, and
local spaces.
E: On the right side of O3DE Editor, Entity Inspector displays the components of the currently selected entity. At the top of Entity Inspector is a field for the entity Name and an Add Component button. The Add Component button opens a list of available components, sorted by type, that can be added to the entity. Each component has its own set of properties that are displayed in Entity Inspector. All entities contain a transform component that sets the position, rotation, and scale of the entity in the level.
Note:Components are provided by Gems. If you can’t find a particular component in the available components list, ensure you have the Gem that provides the component enabled in your project.F: At the bottom of the default O3DE Editor layout is the Editor Console, which shows command and process output from O3DE Editor and your project. When you load a level, for example, the console displays messages about assets and configuration files as they load, and might display warnings and errors if issues are encountered.
You can enter console commands such as setting console variables in the entry field at the bottom of the console. Choose the {x} button in the lower left of Editor Console to open the Console Variables Editor, which provides a simple interface for setting console variables.
At the very bottom of O3DE Editor is the Status Bar which displays information about editor processes, Asset Processor jobs, and version control information.
Navigating the O3DE Perspective viewport
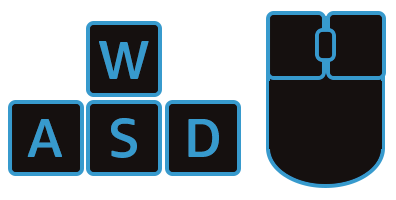
O3DE has familiar viewport interaction models based on first-person PC games and popular modeling applications, with a few minor tweaks and additions. Movement is handled by keyboard input, and view is handled by pointer device input.

- W - Move forward.
- S - Move backward.
- A - Move left.
- D - Move right.
- Q - Move down.
- E - Move up.
- Z - Focus on selected.
- RMB+Drag - Rotate view, known as mouselook in most games.
- MouseWheel Up/Down - Zoom view.
- MMB+Drag - Pan view.
- LMB - Select entity.
- LMB+Drag - Area select entities.
The camera controls above are game-centric. If you prefer to use camera controls closer to those you would find in a DCC application such as Maya, use these hotkeys.
- Alt+LMB+Drag - Orbit view.
- Alt+RMB+Drag - Dolly view.
- Alt+MMB+Drag - Track view.
Movement preferences
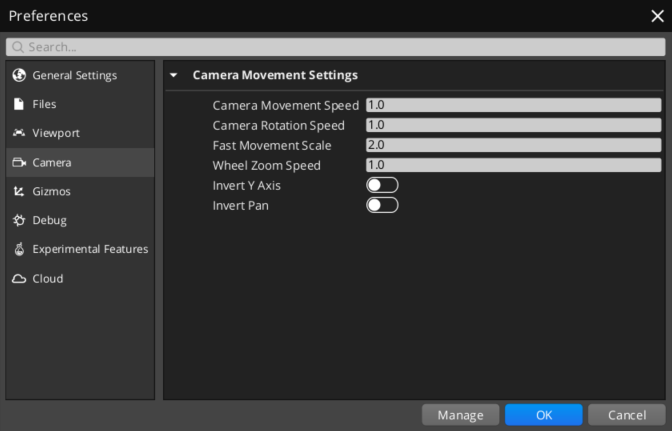
You might prefer to invert either axis of your editor camera controls, or, you might want to speed up or slow down the default movement or rotation of the editor camera. You can adjust the default editor camera control behavior by setting the Camera Movement Settings properties in the Global Preferences editor.

In the Edit menu, from the Editor Settings group, choose Global Preferences. Select Camera from list on the left. Here, you can invert either mouse axis and adjust the movement speed of the editor camera.
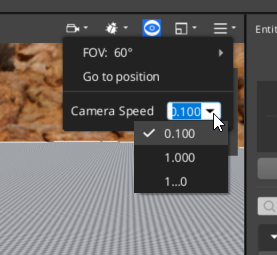
When you have your movement preferences set to your liking, you might find at times that the editor camera movement is too fast or too slow in certain situations. You can adjust the movement speed by choosing the Camera icon in the Perspective Toolbar at the top of the Perspective pane.

Enter a floating point value in the Speed property to set movement speed. You can also click the arrow to the right of the Speed property to set the movement speed to 0.1, 1.0, or 10.0.
Save Perspective locations
As you build a level, you might find that it’s helpful to have preset Perspective views saved for later use. You can save the current editor camera view, assigning it to a [Function] key:
- To save a Perspective location, press [Control + Function(1-12)].
- To set the Perspective view to a saved location, press [Shift + Function(1-12)].
